
SolverCloud
Open-source solvers in the cloud
Remote Desktop to Your Sandbox
Your sandbox is a full Ubuntu 24.04 LTS desktop with remote desktop already enabled. Open Windows Remote Desktop, enter your VM's IP, and you're in — or use NoMachine and the other clients covered here.
Ubuntu 24.04 LTS Desktop · GNOME on Xorg · x86_64
xrdp preinstalled · port 3389
On this page
1. Before you start
Every option on this page begins the same way: your VM must be running, and you need its connection details. For RDP that's all — the other clients additionally need a shell on the VM.
What you need
A running VM. Open My VMs and check the power state. A stopped VM accepts no connections — press play and wait for it to report running.
Public IP, admin username and admin password. On the VM row, click the info icon to open details & connection info. Each value has a copy button; the password is hidden until you click the eye icon.
An SSH client — only for sections 4 to 7. Built into Windows 10/11, macOS and Linux, so just open PowerShell or Terminal. Windows Remote Desktop needs no shell at all.
Open a shell on the VM
Skip this if you're using RDP. Otherwise substitute the username and IP from the VM details modal — on the first connection, accept the host key fingerprint, then enter the admin password.
ssh <admin-username>@<public-ip>
2. Which client should I use?
RDP is ready now; the rest are a deliberate choice. The differences that matter are what you have to install on the VM, how they hold up over a slow link, and whether you get the live desktop session or a fresh one.
| Option | On the VM | Port | Session | Best for |
|---|---|---|---|---|
| Windows Remote Desktop (xrdp) | Preinstalled | 3389 | New session | Almost everyone — zero setup on both ends |
| NoMachine | You install | 4000 | Live desktop | Smoothest picture; 3D post-processing, ParaView |
| X2Go | You install | 22 (SSH) | New session | Low bandwidth; nothing extra to open |
| VNC (TigerVNC) | You install | 5901 | New session | Maximum client choice, minimum assumptions |
| Chrome Remote Desktop | You install | None inbound | New session | Restrictive corporate firewalls |
Not sure? Use RDP.
It's already running on the VM, and on Windows the client is already on your machine — there is genuinely nothing to install. Only reach for NoMachine if you're doing heavy 3D visualisation and the picture feels sluggish, or for X2Go if your connection is poor.
3. Windows Remote Desktop (RDP)
Ready to useWindows
macOS / iOS
Linux
xrdp comes preinstalled on every sandbox and starts automatically with the VM, listening on port 3389. Windows has shipped a Remote Desktop client for decades, so on Windows there is nothing to install at either end — you only need the IP, username and password.
Nothing to do on the VM
You don't need to SSH in first. Skip straight to your client below — the login screen you'll see is xrdp's, and it takes the same admin username and password shown in the VM details modal. If it doesn't answer, the troubleshooting section has the repair commands.
Connect from your machine
Windows
- Press
Win + R, typemstscand press Enter — or search the Start menu for "Remote Desktop Connection". - Paste your VM's public IP into Computer and click Connect.
- Accept the certificate warning (see the note below).
- xrdp shows its own login screen. Leave Session set to
Xorg— that's the default — and enter your admin username and password. This is the Linux account from the VM details, not a Windows login. - The screen sits on "Just connecting" for a moment, then your GNOME desktop loads.
The Windows App from the Microsoft Store works the same way and remembers connections for you.
macOS, iPadOS, iOS, Android
Install Windows App (previously called Microsoft Remote Desktop) from the App Store or Play Store. Add a PC, set the host to your public IP, and leave the rest at defaults.
Linux
Use Remmina (graphical, ships with most distributions) or FreeRDP from the terminal. On Ubuntu 24.04 the FreeRDP binary is xfreerdp3; older releases call it xfreerdp.
xfreerdp3 /v:<public-ip> /u:<admin-username> /dynamic-resolution +clipboard
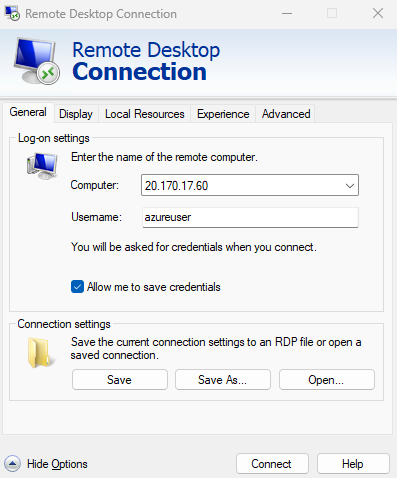
1. Put the public IP in Computer and connect.
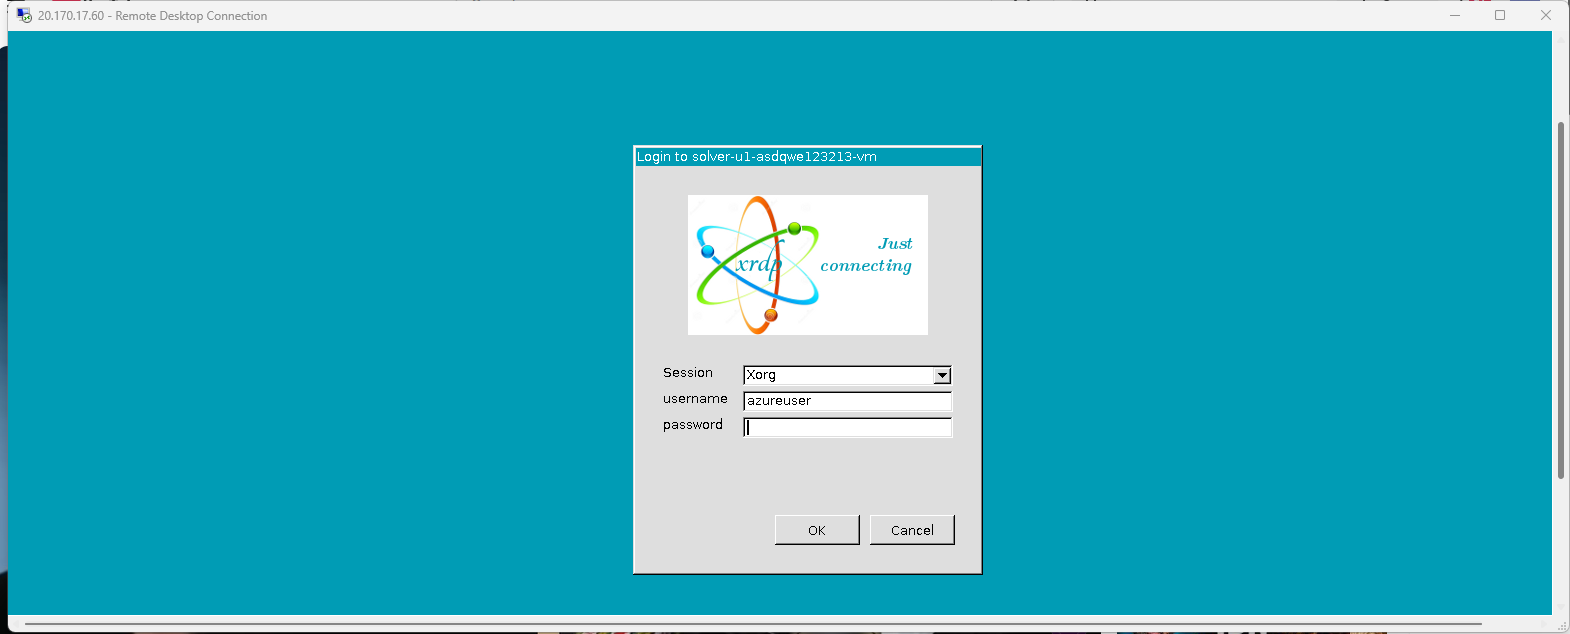
2. xrdp's own login screen — leave Session on Xorg, then sign in with the admin account.
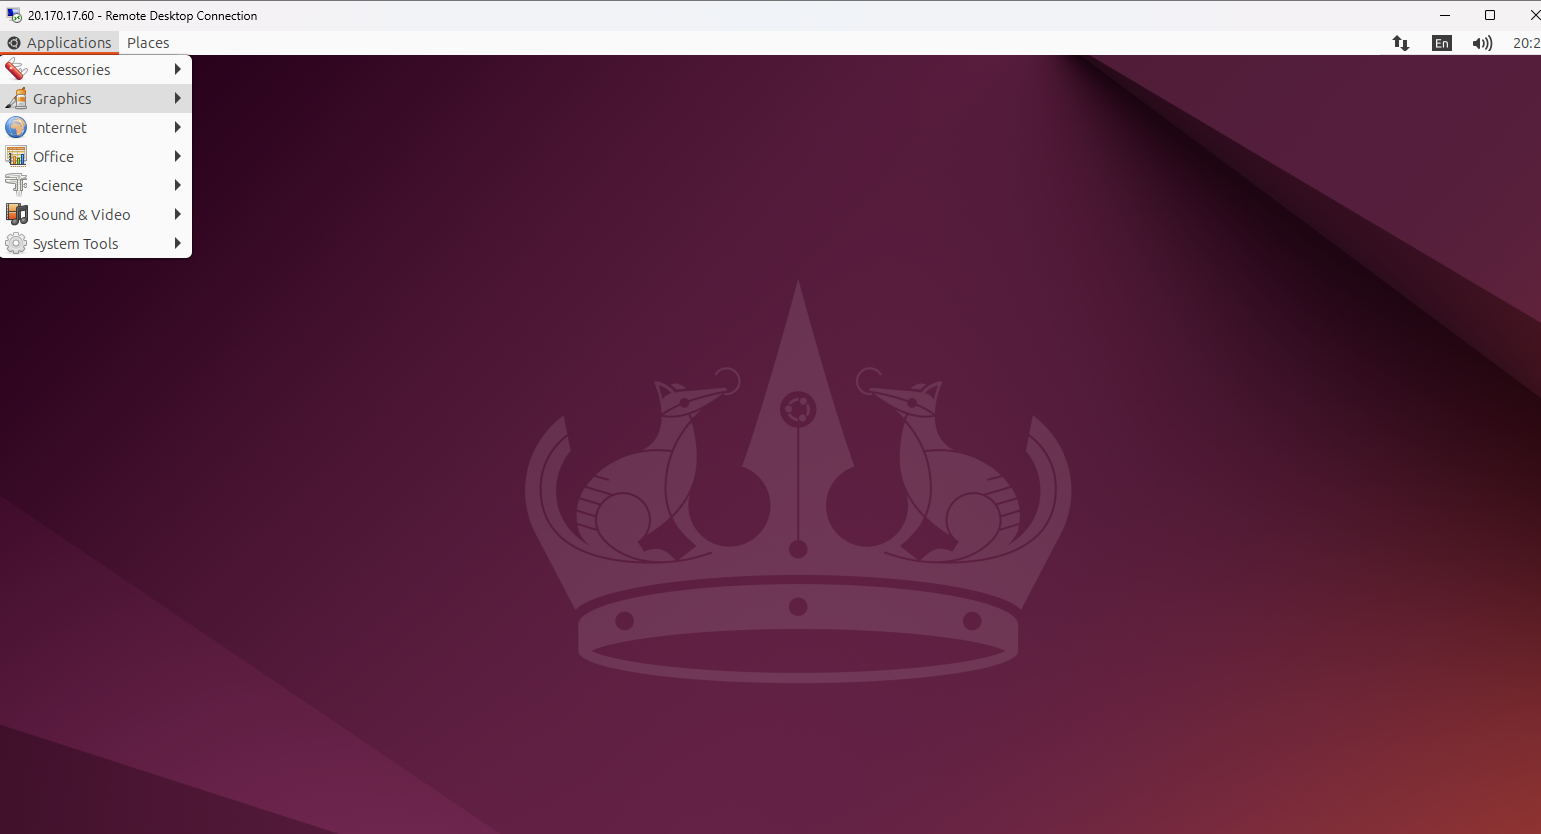
3. Your sandbox desktop, with the applications menu open.
4. NoMachine
Best picture qualityWindows
macOS
Linux
NoMachine uses its own NX protocol with H.264 video encoding, which holds up much better than RDP or VNC when you're rotating a mesh in ParaView over a long-haul link. It's free for direct connections like this one.
It attaches to the live desktop
Unlike xrdp and VNC, NoMachine connects to the physical display that's already running — the same session, with the same open windows, every time you reconnect. That works because your sandbox runs GNOME on Xorg rather than Wayland.
On the VM (over SSH)
Download the NoMachine server package
Grab the current NoMachine for Linux · DEB · x86_64 link from downloads.nomachine.com and paste it in place of the URL below — version numbers change often.
cd /tmp
wget -O nomachine.deb "<paste-the-deb-url-here>"
Install it
The installer sets up the service and starts it; there is nothing to configure.
sudo apt install -y /tmp/nomachine.deb
Check it's listening on port 4000
sudo /usr/NX/bin/nxserver --status
ss -tlnp | grep 4000
From your machine
- Download the NoMachine client for your operating system from nomachine.com/download and install it.
- Open NoMachine and click Add to create a new connection.
- Set Host to your VM's public IP, Port to
4000, and Protocol toNX. - Connect, then sign in with the admin username and password from the VM details modal — NoMachine authenticates against the Linux account.
- Accept the host fingerprint on first use, and choose the existing display when prompted to attach to the running desktop.
5. X2Go
Lowest bandwidthWindows
macOS
Linux
X2Go tunnels everything through SSH on port 22, so there's no extra port to think about and the session is encrypted by default. It's the most forgiving option on a poor connection, and it can suspend a session and resume it later from a different machine.
On the VM (over SSH)
sudo apt update
sudo apt install -y x2goserver x2goserver-xsession xfce4 xfce4-goodies
That's the whole server side — X2Go rides on the SSH daemon that's already running, so there's no separate service to enable.
From your machine
- Install X2Go Client from wiki.x2go.org . On Linux it's usually just
sudo apt install x2goclient. - Create a new session and give it any name you like.
- Set Host to the public IP, Login to the admin username, and leave SSH port at
22. - Set Session type to
XFCE— this is the step people miss. - Click the session box and enter your admin password.
6. VNC (TigerVNC)
Windows
macOS
Linux
VNC is the lowest common denominator: dozens of clients speak it on every platform, including RealVNC Viewer, TigerVNC Viewer, Remmina and macOS Screen Sharing. The trade-off is that raw VNC is the weakest of these options on both security and responsiveness, so run it through an SSH tunnel.
On the VM (over SSH)
Install the server and set a VNC password
This password is separate from your admin password and is truncated to 8 characters by the protocol — another reason to keep the port off the internet. Answer no to the view-only password.
sudo apt update
sudo apt install -y tigervnc-standalone-server tigervnc-common
vncpasswd
Tell the session which desktop to start
GNOME Shell is unreliable inside a virtual VNC display, so start XFCE here too — install it with
sudo apt install -y xfce4 xfce4-goodiesfirst.mkdir -p ~/.vnc tee ~/.vnc/xstartup >/dev/null <<'EOF' #!/bin/sh unset SESSION_MANAGER unset DBUS_SESSION_BUS_ADDRESS exec dbus-launch --exit-with-session startxfce4 EOF chmod +x ~/.vnc/xstartup
Start the server, bound to localhost
Display
:1means TCP port 5901. Keeping it on localhost means only an SSH tunnel can reach it.vncserver -localhost yes -geometry 1920x1080 -depth 24 :1
From your machine
1. Open the tunnel and leave it running
ssh -L 5901:localhost:5901 <admin-username>@<public-ip>
2. Point your viewer at the local end
In RealVNC Viewer, TigerVNC Viewer or Remmina, connect to the address below and enter the VNC password you set with vncpasswd.
localhost:5901
To stop the session later, run vncserver -kill :1 on the VM.
7. Chrome Remote Desktop
No inbound portsWindows
macOS
Linux
The VM makes an outbound connection to Google's relay, so nothing has to be reachable on the public IP at all. That makes this the option that works from inside a corporate network that blocks everything except web traffic. You'll need a Google account, and the session runs in a browser tab.
On the VM (over SSH)
Install the host package and a desktop for it
cd /tmp
wget https://dl.google.com/linux/direct/chrome-remote-desktop_current_amd64.deb
sudo apt install -y ./chrome-remote-desktop_current_amd64.deb
sudo apt install -y xfce4 xfce4-goodies
Choose the session desktop
echo "exec /usr/bin/xfce4-session" > ~/.chrome-remote-desktop-session
chmod +x ~/.chrome-remote-desktop-session
Authorise the machine
Open remotedesktop.google.com/headless in your own browser, follow the wizard, and copy the Debian/Linux command it generates. Paste that command into your SSH session and set a six-digit PIN when prompted.
The VM then appears under Remote Access at remotedesktop.google.com/access , from any browser signed in to the same Google account.
8. Securing the connection
Convenience has a flip side: because xrdp is preinstalled and your sandbox has a public IP, port 3389 is reachable from the internet as soon as the VM starts. Automated scanners find new RDP endpoints within minutes and will try common passwords against them, so a few habits matter.
Use a strong admin password. This is the one that matters most, because it's the only thing standing in front of an open RDP port. If you left the password field blank at VM creation, SolverCloud generated a strong one for you — keep it rather than swapping in something memorable.
Prefer a tunnel when you can. X2Go does this for free. For xrdp, NoMachine and VNC you can bind the service to localhost and forward the port over SSH instead — see the commands below.
Stop the VM when you're done. A stopped machine has no attack surface and costs far less. Both live on the same page: My VMs.
Treat the sandbox as scratch space. Keep the authoritative copy of your case files somewhere you control, and don't store credentials for other systems on the VM.
Tunnelling a remote desktop port over SSH
Run one of these locally and leave the terminal open, then point your client at localhost and the same port instead of the public IP. This also gets you in when a network you're on blocks 3389 or 4000 outbound.
# RDP — then connect your client to localhost:3389
ssh -L 3389:localhost:3389 <admin-username>@<public-ip>

# NoMachine — then connect to localhost, port 4000
ssh -L 4000:localhost:4000 <admin-username>@<public-ip>
Taking xrdp off the public internet entirely
If you'd rather only ever reach the desktop through the tunnel above, bind xrdp to the loopback address. Open its config and, in the [Globals] section — the one at the very top — set the address line as shown, adding it if it isn't there. Placing it in any other section has no effect.
sudo nano /etc/xrdp/xrdp.ini
[Globals]
address=127.0.0.1
Save, then restart the service. Verify the listener now shows 127.0.0.1:3389 rather than 0.0.0.0:3389:
sudo systemctl restart xrdp
ss -tlnp | grep 3389
address=0.0.0.0 and restart xrdp again.9. Troubleshooting
Ready to connect?
Grab your VM's public IP and admin credentials, then pick the client that fits how you work. If you don't have a sandbox yet, one is a few clicks away.
SolverCloud
© 2026 SolverCloud, a NumericalAI product by Empirisch Tech GmbH (empirischtech.at). All rights reserved. |Privacy Policy |Terms of Service |FAQ |Licenses